Salesforce CRM Add-On
Introduction
The Salesforce Add-On is a premium one, you can buy it in one of our subscriptions. Thank you!
The iform4u Salesforcee Add-On gives you an easy way to integrate all of your online forms with the Salesforce CRM, to achieve High-Converting Lead Capture Forms and more.
Capture more leads and contacts from your website and sends customer data to Salesforce; helping you develop and keep healthy relationships with your newest visitors.
Smooth Automation
Send submitted data from your forms directly into your CRM account.
Build Better Relationships
Full support for multiple objects: Leads, Contacts, Accounts, Opportunities and Cases.
Map Salesforce Fields
Easily map your iform4u fields to your Salesforce fields and Gain more information about your customers.
Opt-In Conditional Logic
Control opt-in and only add data when a certain condition is met.
Install Salesforce Add-On
The Salesforce Add-On installing process is very simple, same to any other Add-On. To install the Salesforce Add-On go to Add-Ons menu and configure it.
Create a Sign Up Form
To create a Form through the Form Builder you just need to drag and drop the fields your form needs.
Then, from the Salesforce Add-On interface you can select the fields that will collect the necessary information to send to Salesforce. For example, email, name, etc.
Now, to create a Sign Up Form follow the next steps:
- Click the Set Up a Form button
- Enter your Salesforce username, Salesforce password and Salesforce user security token. Click here to get more information. Also, REST API must be enabled in your Organization.
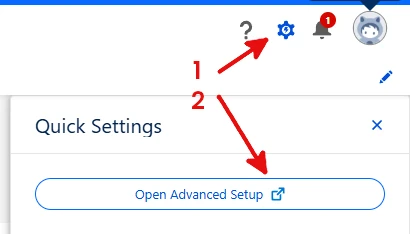
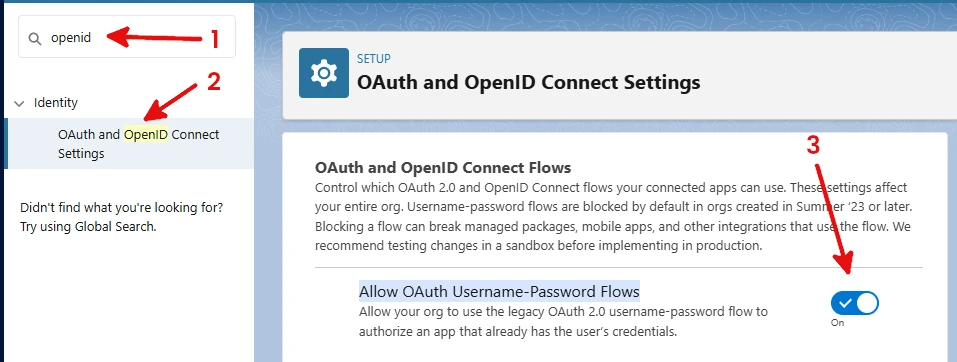
- If you create your Salesforce org in Summer ’23 or later, the OAuth 2.0 username-password flow is blocked by default so you have to enable it.
- Open Advanced setup
![Salesforce setup access]()
- In Quick Find write "openid" and choose OAuth and OpenID Connect Settings
- Mark Allow OAuth Username-Password Flows
![Salesforce oauth setup]()
- Open Advanced setup
- Finally, you need to map the form fields (iform4u) to the list fields (Salesforce object fields).
- Name: Enter a configuration name to recognize this configuration in the system.
- Select your Form
- Select your List: Salesforce Object. It can be: Account, Contact, Lead, Opportunity, Case, Task
- Click on Status: ON.
- Enable an Opt-In Condition. The opt-in condition shows that in order to forward information to Salesforce, the field value must be present when the form has been submitted.
- Map Fields:
- Map a Form Field to a List Field (Salesforce Object Field): You need to map every list field with the "Required" label.
- Advanced Settings: This tools allows you keep updated your CRM records. For example, you can create a lead or update it if his email exist in the CRM. No all Salesforce object can be updated (Cases and Opportunity).
- Action: It can be:
- Search and create: Will insert new records, without updating any record.
- Search and update: Will update the found record, but won't create new records.
- Search and update or create: Will update the found record. If no record found, will create a record.
- Search Priority: There are two options:
- First lead, then contact: Use this option if you want to capture leads.
- First contact, then lead: If you want to work with contacts, instead leads, select this option. For example, if you want to create a Case, you can link the case to an existing contact, by his email address.
- Search By: Allows you to define what Salesforce Object property we are going to use to find the records. Currently, you only can select "Email".
- Email Field: This must be the Form email field we are going to use to search the record.
- Account Name Field: Used to create an account at the same time you can create other Salesforce object.
- First Name Field: Used to create a contact at the same time you can create other Salesforce object
- Last Name Field: Used to create a contact at the same time you can create other Salesforce object.
- Action: It can be:
- Qualify Lead: You can enable this option to Capture Qualified leads. Also, you have the option to create additional objects in the Wualification process:
- Create Account: Use the Account Name Field to create the Account.
- Create Contact: Use the First Name Field and Last Name Field to create the Contact.
- Create Opportunity
- Save the Form.


